")
Step 1: Preparing the Clay Base
To enhance the porcelain-like look, I start with a blend of white polymer clay and translucent polymer clay. This combination gives the surface more depth and softness — very similar to real ceramic.
Condition the clay thoroughly
Roll it through your pasta machine on setting #3 (or #4 if you prefer thinner pieces)
Prepare two clay sheets: one for the front and one for the back
This double-layer approach will give your final pieces strength, balance, and a professional finish.
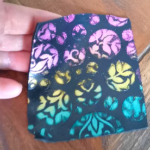
Step 2: Adding Color with Stencils and Mica Powders
Next comes one of my favorite parts: building color through layering and overlays.
I use a stencil with both small and large round openings and apply mica powders in bright, modern shades:
Yellow
Orange
Reddish orange
Blue
Green
For smaller openings, I stick to one color. For larger ones, I blend two colors together, allowing them to merge naturally for a more organic, ceramic-inspired effect.
Tip: I prefer using my fingers when working with mica powders — it gives me more control — but an applicator works just as well. Keep baby wipes nearby to clean your fingers between colors.
Once the first layer is done, I reposition the stencil and apply mica powders again, directly over some of the previous areas. This overlaying technique creates depth, movement, and visual interest — very similar to glazed ceramic surfaces.
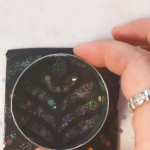
Step 3: Texture and Contrast with Stamping
To introduce texture, I use a bamboo-pattern stamp together with a black chalk ink pad.
Stamp the front clay sheet firmly
Press evenly to create embossed areas
The ink settles into the texture, enhancing contrast and detail
This combination of color, texture, and embossing is key to achieving that refined faux ceramic look.
For the back of the piece, I repeat the process using the second clay sheet, often with the remaining ink on the stamp for a softer effect.
Step 4: Assembling the Clay Slab
Now it’s time to bring everything together:
Flip the back clay sheet
Place the colored front slab on top
Gently press them together using baking paper
This creates a clean, unified slab with a decorative front and a textured back — ideal for jewelry components.
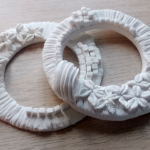
Step 5: Cutting and Refining Shapes
Choose how you want to turn your slab into jewelry:
Freehand cutting
Paper templates
Clay cutters (my preferred option for clean lines)
I used a variety of cutters to to create beads and components suitable for earrings and pendants.
 Important: Take the time to smooth the edges before baking. This small step saves you from wet sanding later — especially if, like me, you’re not a fan of sanding.
Step 6: Baking the Pieces
Bake the pieces on baking paper
Tent them with aluminum foil or use a disposable aluminum pan
Bake for 45 minutes in a preheated oven at the manufacturer’s recommended temperature
Tenting protects light-colored clay from direct heat and helps preserve the clean ceramic look.
Let the pieces cool completely before moving on.
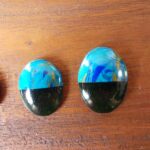
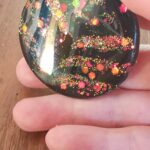
Step 7: Creating the Glossy Ceramic Finish
To achieve that unmistakable glazed ceramic surface, I apply UV resin:
Apply a generous layer straight from the bottle
Check the edges carefully before curing
Use a heat gun or torch to remove air bubbles
I cure the resin for two consecutive minutes using a fast-drying UV lamp.
 Always wear gloves and work in a well-ventilated space when using resin.
Step 8: Drilling and Assembling Jewelry
Once cured:
Drill holes using a hand drill (front to back, then back to front)
Assemble using jump rings and jewelry pliers
Attach stud earring components or use the pieces as pendants or necklace elements
The result? Elegant polymer clay jewelry with a refined Fine China-inspired ceramic finish.
Final Thoughts
This faux ceramic technique is one of my favorites because it’s:
-
Easy to adapt
-
Visually rich
-
Perfect for modern jewelry designs
If you found this tutorial helpful, I’d love to know: How would you use this faux ceramic effect in your own jewelry?
Leave a comment, subscribe for more polymer clay techniques, and explore more tutorials at:  www.LearnPolymerClay.com
Happy creating 

")