")
Hello dear polymer clay enthusiast!
Today, I’m thrilled to share with you a fascinating project that will help you create a pendant that rivals the beauty of real dichroic glass. We’ll be using polymer clay, nail art glitter, and gold metal leaf to achieve a dazzling effect. This step-by-step tutorial will walk you through every step of the process, ensuring your pendant is nothing short of spectacular.
Here’s the complete material list for the project:
- Black polymer clay
- 3 stencils
- Nail art glitters: purple, indigo, blue
- Imitation gold metal leaf
- A triangle cutter
- Polymer clay tools: blade, smoothing tools
- A floral texture plate
- Oven, baking paper
- Pasta machine
- UV resin and a lamp
- Heat gun
So, let’s dive in!
https://youtu.be/uMXMM5C3vdoStep 1: Conditioning the Polymer Clay
First and foremost, it’s essential to properly condition your polymer clay. This ensures that the clay is smooth and pliable, making it easier to work with. I recommend passing your clay through the third setting of an Atlas Pasta machine. This will give you a consistent thickness, which is crucial for the upcoming steps.
Step 2: Preparing the Clay Piece
Next, you’ll want to prepare a piece of clay that is the right size for your chosen cutter. In this case, I’m using a triangle cutter. Once you have your clay slab ready, it’s time to move on to the fun part – decorating!
Step 3: Masking with Scotch Tape
One of my favorite tricks is using Scotch tape to mask off areas of the clay slab. This technique allows you to control where you apply your decorative elements, ensuring clean and precise patterns. Simply cover the areas you want to protect with the tape.
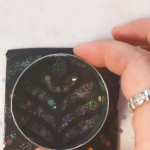
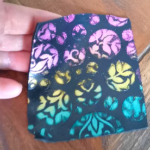
Step 4: Applying Nail Art Glitter
Now, let’s bring out the nail art glitter! For this project, I used a stencil with a beautiful pattern and gently pressed it into the polymer clay. Then, I applied purple nail art glitter to the upper part and indigo nail art glitter to the bottom. Feel free to mix the two colors in some areas to create a gradient effect. Additionally, I added a touch of blue nail art glitter to enhance the overall look. The combination of black clay and vibrant glitters creates a stunning visual contrast.
Step 5: Creating Additional Patterns
To add even more interest to your pendant, use another stencil on the opposite side of the Scotch tape. This time, apply bluish nail art glitter to the upper part of the design and purple glitter to the bottom. Remember to keep baby wipes handy to clean your hands and stencil between colors. Once you’re satisfied with the glitter application, gently remove the Scotch tape to reveal your design.
Step 6: Adding Gold Metal Leaf
Now, it’s time to incorporate some gold metal leaf for a touch of elegance. Use a stencil with a narrow, multiple arrows pattern and apply the gold leaf carefully. To protect the areas you don’t want to cover, use paper. When working with metal leaf, it’s essential to lightly press it into the clay and remove the excess. If you notice tiny scraps flying around, hold your breath and use baby wipes to clean your workspace.
Step 7: Texturing the Back
For a professional finish, I like to texture the back of my pieces. In this case, I used a floral stamp and pressed it into the clay. While the pattern may not be highly visible on the finished piece, it adds an interesting detail to the back. Once textured, flip the polymer clay over and place the decorated clay on top.
Step 8: Combining the Layers
To ensure your layers adhere well, use parchment paper to gently press them together. Be careful not to distort the textured back. For this project, I opted for a slightly offset round cutter to create a unique design. After cutting, smooth off the edges to achieve a polished look.
Step 9: Adding Dramatic Details
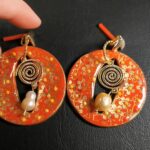
To make your pendant even more exciting, consider adding additional elements. I decided to cut the area decorated with the gold metal arrow in half and added tiny spirals of black polymer clay. These spirals create a dramatic effect and add a touch of sophistication. Align the cut-out areas on the sides and place the spirals in between. Press gently to ensure everything adheres well.
Step 10: Baking the Pendant
Once you’re happy with the look of your piece, it’s time to bake it. Place the pendant on a tile wrapped in parchment paper and bake it in a preheated oven at the recommended temperature for 45 minutes. Tenting your pieces during baking helps prevent discoloration and ensures even curing. After baking, let the clay cool down completely.
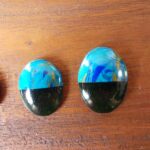
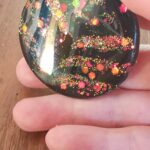
Step 11: Applying UV Resin
The final step is to apply UV resin to give your pendant a glossy, faux glass look. Elevate the piece using a metallic cutter and start from the middle, spreading the resin with the tip of the bottle. Be cautious not to apply too much resin to avoid drippings. If any resin drips, clean it with rubbing alcohol on a baby wipe. Pay special attention to the area around the hole for the jump ring, ensuring it’s neat and tidy.
Step 12: Curing the Resin
Once you’re satisfied with the resin application, cure it under a UV lamp according to the manufacturer’s instructions. This step will enhance the beautiful effect of the glitter and metal foil, giving your pendant a fabulous finish. After curing, inspect your piece to ensure all elements are well-adhered and the resin is smooth.
Conclusion
Creating a stunning pendant that rivals real dichroic glass is a rewarding and enjoyable process. With a bit of patience and creativity, you can craft a piece of jewelry that will turn heads and attract lots of compliments. Remember, the key to success is in the details – from conditioning the clay to applying the final layer of resin.
Thank you for joining me on this creative journey. I hope you enjoyed this tutorial and feel inspired to create your own dazzling pendants.
Time stamps for the video:
00:00 Intro00:32 Colouring with nail art glitters
03:23 Applying imitation gold metal leaf
04:48 Texturing the back
05:43 Putting the pieces together
06:11 Cutting out the piece
06:48 Cutting the piece in two
07:02 Making the spirals
08:56 Assembling the design
10:14 Baking instructions
10:44 Applying UV resin
14:12 Removing air bubbles
14:25 Curing the UV resin
15:14 Outro
Happy claying!
Mihaela
And if you liked this idea, I think you might like this tutorial as well. I’m testing 4 image transfer media. Don’t you want to know what’s the best one? Check it out: https://learnpolymerclay.com/testing-4-ways-to-transfer-laser-printed-images-onto-polymer-clay-including-my-favorite-one/