Hello, dear polymer clay enthusiast!
Let’s make a pair of Modern Clay Earrings with Extruded Canes ! I’m so thrilled to share this fun and creative project with you and show you how to use easy to make paper stencils, extruded canes, and vibrant Pan Pastels!
Here’s the easy step-by-step video tutorial:
- Fimo Professional Polymer Clay: True yellow, blue, and magenta
- Metallic Cutter
- Pan Pastels: Magenta and Ultramarine Blue
- Extruder and Small Square Disc
- Imitation Gold Metal Leaf
- Paper, Scissors,
- Texture Plate,
- Hand Drilling Tool,
- UV Resin and UV Lamp,
- Heat Gun,
- Smoothing Tools,
- Craft Knife,
- Pliers,
- Roller or Pasta Machine,
- Jump Rings, Stud Earring Components,
- Baking Paper & Oven
Step-by-Step Tutorial
Let’s dive into the step-by-step process of creating these stunning polymer clay earrings with a modern look.
Step 1: Prepare the Clay
First and foremost, condition your polymer clay. Proper conditioning ensures that the clay is pliable and easy to work with. For this project, we’ll use true yellow for the base of the earrings. Of course, you can try this out with other colors of clay.
- Condition the Clay: Initially, work the clay in your hands until it’s soft and flexible. This may take several minutes, especially if the clay is old or firm.
- Cut Round Pieces: Next, use the extruder to cut round pieces of clay. Alternatively, you can use a small round cutter to cut out the round pieces.
Step 2: Create the Canes
Extruded canes are a fantastic way to add intricate patterns and designs to your polymer clay projects. Furthermore, they’re easy to make and you’ll end up with long canes and lots of slices, giving you plenty to embellish many clay pieces. Isn’t it great?
- Apply Gold Leaf: Optionally, apply imitation gold metal leaf to some of the pieces. (You can totally skip this step. I tested out this idea, but the metal leaf does not show much in the cane slices.)
- Stack the Clay: Subsequently, stack the clay pieces in a yellow, magenta, blue sequence. This will create a colorful pattern when sliced.
- Roll into a Log: Then, roll the stacked pieces into a log until it reaches the desired size to fit inside the extruder.
- Extrude the Canes: Insert the log into the extruder and use a small square disc to extrude the clay. This will create a long cane with a beautiful pattern called a retro pattern.
- Cut Thin Slices: Finally, use a sharp blade to cut thin slices from the cane. The colors inside the slices will change slightly as you progress, adding to the beauty of your design.
Step 3: Form the Earring Focal Beads
Now that you have your cane slices, it’s time to form the base of the earring focal beads.
- Prepare the Backing: Roll out yellow clay to create the backing. Use a texture plate and pasta machine to add texture. I just love putting the clay (already conditioned and passed through a thinner setting) on top of the texture plate through the pasta machine because I end up with such a deep textured sheet of clay, perfect for making the back of my clay designs.
- Cut the Shapes: Then, use a metallic cutter to shape the earrings. Ensure that the edges are smooth and even.
- Combine Layers: Finally, stack the textured backing with the patterned clay slices, pressing gently to adhere.
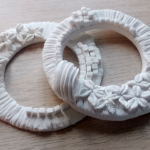
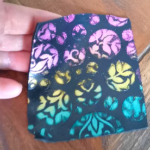
Step 4: Make a Paper Stencil
Creating a paper stencil is an easy way to add intricate patterns to your clay pieces. And it’s dirt cheap. So, you have to try this out!
- Fold and Cut the Paper: To begin, fold a small piece of paper in half, then fold it again several times. Cut a zigzag pattern along the folded edge.
- Create the Stencil: Open the paper and cut it in half to make two stencils. These will be used to add patterns to each earring.
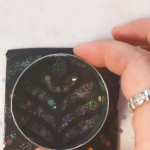
Step 5: Add Color with Pan Pastels
Pan Pastels are perfect for adding rich, vibrant colors to your polymer clay designs.
- Apply Pastels: First, place the paper stencil on the clay and use an applicator to apply magenta Pan Pastel to one half of the focal piece. This way, you’ll be able to add more interest to your clay designs in an easy and very economical way. Yes, yes!
- Mirror the Pattern: For a mirrored look, alternate sides for each earring. It’s so easy. And the result is quite nice. Don’t you think?
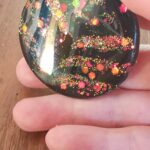
Step 6: Decorate with Cane Slices
Enhance your design by adding cane slices to the clay base.
- Select Cane Slices: Choose slices with a yellow center to complement the background. I’ve chosen slices with a yellow dot in the center on purpose to emphasize the color of the background, but you can choose any slice you want.
- Press the Slices: Next, use a roller and parchment paper to gently press the slices into the base.
- Add Gold Leaf: Additionally, for added interest, apply more imitation gold leaf to some of the slices.
Step 7: Bake the Clay
Bake the decorated pieces to harden the clay.
- Bake the Pieces: Place the pieces on baking paper and bake in a preheated oven at the recommended temperature for 40 minutes. I bake my pieces on parchment paper because I’m making the front and the back at the same time.
- Cool Down: Allow the clay to cool completely before handling.
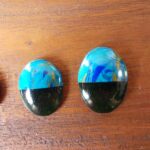
Step 8: Apply UV Resin
UV resin adds a beautiful glossy finish to your earrings, making them look polished and professional. If you’re not a fan of resin or UV resin, use the varnish of your choice to protect the pastels and metal leaf.
- Apply Resin: Begin by applying UV resin to the center of each piece, using the tip of the bottle to spread it evenly. Check from the sides to see if you need to add more resin in some areas.
- Remove Air Bubbles: Use a heat gun to eliminate any air bubbles in the resin. It’s easy to forget this step, but I recommend you do it.
- Cure the Resin: Place the pieces under a UV lamp for two minutes to cure the resin. I just love the shine of these pieces coated with resin. How about you?
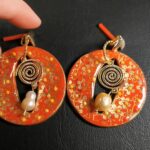
Step 9: Assemble the Earrings
Finally, assemble the earrings by adding jump rings and earring studs.
- Drill Holes: Use a hand drilling tool to poke holes for the jump rings.
- Add Jump Rings: Attach small gold color jump rings to the holes.
- Attach Earring Studs: Finish by attaching minimalist stud earring components. At least, this is what I did.
Conclusion
And there you have it! A stunning pair of modern and unique polymer clay earrings that are sure to impress. This project is a wonderful way to explore different techniques and materials, and the results are truly beautiful. What do you think?
And yes, do try out the paper stencil idea. It’s so easy to make. I really think it’s a great way to spice up your designs. And that zig-zag line adds that little something, turning these earrings into a unique and modern design. At least, this is how I feel about it.
I hope you enjoyed this tutorial and found it inspiring. Don’t forget to like, comment, and subscribe to my YouTube channel for more polymer clay projects. Hit the bell icon to stay updated with new tutorials, and join my newsletter at LearnPolymerClay.com for exclusive tips and updates.
Happy claying!
Mihaela
And if you liked this idea, I think you might like this tutorial as well. I’m testing 4 image transfer media. Don’t you want to know what’s the best one? Check it out: https://learnpolymerclay.com/testing-4-ways-to-transfer-laser-printed-images-onto-polymer-clay-including-my-favorite-one/