Hello dear polymer clay enthusiast!
Do you like to use image transfer onto clay to make beautiful clay pieces?
I personally love this technique and I think it’s a great way to make stunning artsy pieces using beautiful images (watercolor illustrations digital images, vintage designs, botanical prints, etc.)
Furthermore I love the use image transfer onto polymer clay to make seasonal inspired designs: Christmas, Easter, autumn, Halloween, etc. And with the rise of the AI art, the sky is the limit in creating exquisite images to use in the transfer process.
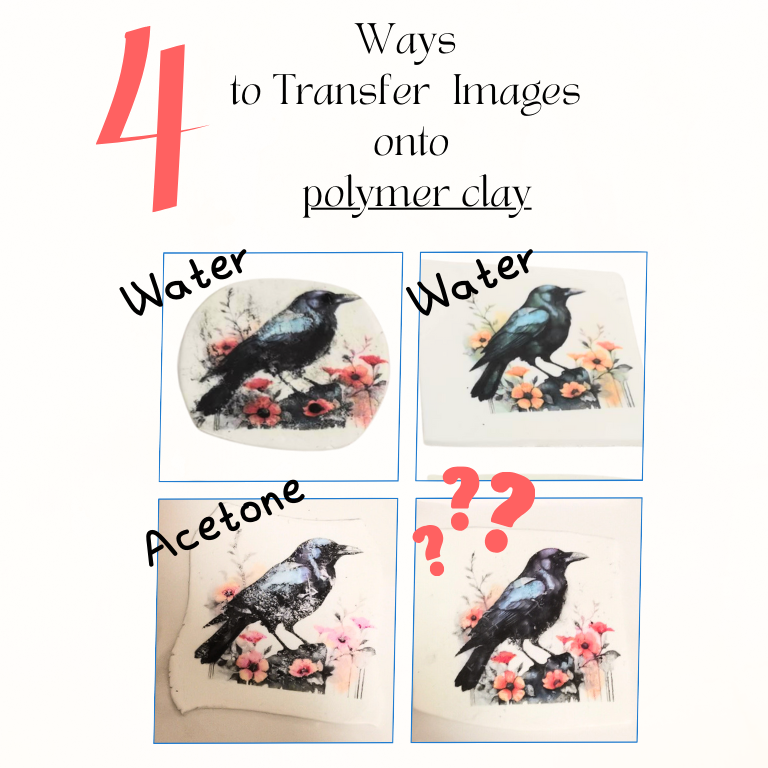
In this tutorial, I’m testing 4 ways and different transfer media to transfer Laser-printed images onto polymer clay. These techniques are based on water, acetone and a secret transfer media (that you already have around the house) and I’m also comparing the benefits and the drawbacks of each technique. So I invite you to watch the video and master the art of image transfer onto polymer clay!
Here’s the link to subscribe to my Clay Insiders’ List and receive not only Royalty free images (the Raven collection in Canva template format that you can edit in your Canva account or by creating a free Canva account), but also you’ll receive your copy of the Ultimate Guide for Polymer clay and you’ll receive even more tips and clay related staff in your email inbox)!
Here is the link to watch the video on Youtube:
Happy claying!
Mihaela
P.S. Tell me what you think of these image transfer techniques in the comments of the video on Youtube!
This is the video transcript:
Hello dear polymer clay enthusiast!
Do you like using beautiful images to
embellish your clay designs?
I personally love using image transfer to make interesting clay pieces.
And in this video, I am going to test the usual ways that you might already know for transferring laser printed images onto polymer clay.
I am going to show you my favorite one, which is using a medium that you might not know and that you might discover in the
video.
Stick until the end of the video, when I’m going to compare the drawbacks and the benefit of each method, and of course, showing you the one that I personally prefer.
So let’s dive into the video.
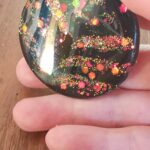
As I said, I’m working with laser printed images. And in fact, these are AI generated images.
And I am a big proponent of using such beautiful images that you can create yourself. And I’m in fact, working on a class on how to make your own designs using free tools. But I’m going to tell more, tell you more about this later.
So I printed the designs that I want to use in the clay transfer onto laser paper.
You’ll have to keep in mind to flip the images if you want to make earrings in case of written messages. You also have to flip the image
before printing it. So keep that in mind.
So I am going to test four ways. I think you might know the first three ones, but you might not know the 4th one.
And I’m going to start with the traditional ones So I’m working with white polymer play. And I always recommend using white or light
colors of polymer clay for best results with image transfer.
And I’m going to start with the method that I’ve been using for years, and that was my go-to method for image transfer.
I will put a little bit of water on top of the white Polymer clay. And I always recommend using white polymer clay or light colors of clay
for image transfer for best results. And then I would put the image facing downwards, so the image would be in contact with white clay.
And then I would take the time to rub the image into the clay. I’m using my fingers to rub the image very well, you can use the back of a handle, or, I don’t know, rounded tools that you have around.
I prefer to use my fingers because I control the areas on which I apply a little bit of pressure. But of course, not too much, because I
don’t want to distort the Polymer clay.
And I’m taking the time because this is a very important part of the process. Burnishing the image into the clay is the secret to beautiful transfers. And when I consider that I rubbed the image enough, I am going to apply water, generous amounts of water on top of the
piece.
And water will dissolve the paper fibers. You might need to let the piece a little bit before trying to remove these paper fibers.
And then you’ll just have to, without touching the clay too much, on the surface of the clay. You’ll just have to gently remove
the paper. You’ll have to take the time to do this. This is not a process that you can hurry.
And you notice, you can easily notice where the paper is on the image, because you have this cloudy look in those areas.
And you might need to add a bit more water in some areas and continue to peel. You will feel at the fingertips, you will fill the areas where the paper is.
And I might rotate the piece. Sometimes I like to start with the most important element to make sure that I got this part right.
If I’m working on a character, a woman’s face or something like that, I would concentrate on the character and then I would take care of the other elements, because this is going to be the focal area of the piece.
And normally, I would leave this piece to the side for five minutes, and the water would dry. I would let the water dry. And then I would check again to see if I still have tiny paper fibers. And I am going to use, again, water to remove those paper fibers, if necessary, keep tissue paper handy to dry out the piece.
If I have small areas where the design did not transfer very well, and this is because I did not burnish the image well.
In those areas, I personally like to use my mica powders or soft pastels or pan pastels to color those areas so I don’t have to
discard the piece. And for this piece, I decided to use a little bit of black mica powder and a very thin brush, and add some
mica to accentuate some areas of the bird of the raven. And normally, if I wanted to turn this piece into a pendant I would use
rhinestones.
I would put one for the eye of the bird to concentrate the attention of the person looking at a piece at jewelry piece
on the raven.
But I would also put three smaller rhinestones on other elements of the piece, to add more interest to the piece and to make it
slightly 3D and to add more interest and more dimension to the piece.
And I would decide how I am going to cut this with a cutter, with the flexible plate, and so on.
But now I’m going to continue with the second method. For the second method, I’m going to use water again, but this time the process is going to be a little bit different.
Meaning for the second method, again, I put, again, I put the image on top of the white polymer clay, facing downward.
I burnished the image into the clay. And then I used lots and lots of water, and I soaked the page with water.
But then I did not try to remove the paper fibers. Instead, I let this piece for one while hour, so that the paper would be dry again.
And then you’ll just have to take a corner of the piece and lift it up from side to side.
Next I am going to use acetone, nail polish remover for this technique. So I’m working with the same image I’m
going to apply a little bit of acetone on top of the clay. And you have to be very careful while
using such a liquid, because it is highly flammable, it is not recommended to have open fire
near, to have lit candles or anything.
So you need to be very careful when using such transfer medium. So I applied, using a make up pad acetone on top of the piece.
Then I put the image on top. I burnished the piece.
And this is something you’ll have to do, in my opinion, for any image transfer. I take time to burnish the transfer onto the piece.
You might use rounded tools, like the handle of a stamp, to burnish the image into the clay. Or you can use a paper folder.
You can use the roller.
I personally prefer to burnish the image with my fingers, as I said. And then I’m going to use the same make-up pad with acetone,
and soak the paper with acetone.
Now I can lift a little bit the corner of the page and see if I got a good transfer. If not, I would have to continue to
burnish the image. As you can see, I’m not lifting the entire piece of paper. I’m keeping it in the same spot.
But I’m continuing to burnish the image. And of course, the more time you take to burnish the image, the better the result. But I’m trying to go a
a little bit faster for the video.
If you notice small paper fibers on the piece, you can use your craft knife to take them off.
You can also use water, like for the water transferring
technique.
And this is the result with acetone. And as I said, I’m going to compare all these techniques at the end and tell you what I feel about them.
So I was working on this image transfer project. And I wasn’t very happy with the traditional technique, because it takes time to remove all the paper fibers,
time to remove all the paper fibers, and sometimes there is a high risk of smudging the image.
It happened to me too, and I cut my finger with the craft knife, but it was a minor cut. And while putting rubbing on alcohol on
my finger. Then at some point I remember that I did some image transfer onto canvases, I think, using rubbing alcohol.
And so I decided to try this transfer medium with the laser printed images and polymer clay.
So I applied some rubbing alcohol on top of the piece. I put the image facing downwards. I burnished the image. You will have to take the time for this
part of the process. Then I’m lifting up the piece in some areas, and I’m checking if the transfer went well, or if I need to insist in some areas.
And then normally, you can take off the paper. If you have smaller paper fibers on the piece, you can use water and remove those as
well.
Of course, you have to have a very gentle touch. You don’t want to smudge the clay which would smudge the image.
And so these are the four inch transfer techniques that I demonstrated to you. And here are the benefits and the drawbacks of each
of the techniques, if there are some.
Now let’s analyze together the drawbacks and the advantages of each technique, if there are some. And I will let you judge which image
transfer technique you prefer the most.
Thank you for watching the tutorial.
As always, I encourage you to take this inspiration, to take these ideas and try them in your work with polymer clay.
Tell me in the comments, which image transfer method you prefer,
and of course, don’t forget to like and
subscribe the video and stay tune for more inspiration for your work with polymer clay!
Hello,
I am a novice and attempting to place a picture transfer on the polymer clay.
I have tried black/white and colored shots with water and acetone.
Nothing is transfered to the clay. Is there a special setting i need to use?
Thank you,
Maria Elena
Hi Maria Elena,
I’m sorry for replying so late. I’ve just seen your message. There are several methods for transferring images onto raw polymer clay. My favorite one is to use an image printed on a LASER PRINTER (not an inkjet printer). I use rubbing alcohol as a transfer medium meaning I apply a little bit of rubbing alcohol on top of the clay, all over the area where I want to transfer the image, then I put the image on top and take the time to rub on the image for several minutes to make sure I have a good transfer. In the beginning I used water as a transfer medium, but in the present I prefer using rubbing alcohol. Then I will gently lift the margins of the paper and try to lift off larger areas of the paper that I used for image transfer. Then I would use water to remove the smaller bits of paper, very careful not to press on the clay in order not to distort de transferred image.
I hope this helps.
I’m sorry again for seeing your message with such a delay.
Have a great day and a beautiful festive season!
Mihaela